Thursday, July 25, 2019

How to make a table read only in Oracle

How to make a table read only in Oracle


Oracle 11g allows tables to be marked as read-only using the ALTER TABLE command.

ALTER TABLE table_name READ ONLY;
ALTER TABLE table_name READ WRITE;

Let’s create a table and make it read-only.

CREATE TABLE Example (id  NUMBER);
INSERT INTO Example VALUES (1);
ALTER TABLE Example READ ONLY;

CREATE TABLE Example (id  NUMBER);
INSERT INTO Example VALUES (1);
ALTER TABLE Example READ ONLY;
Any DML statements that affect the table data results in an ORA-12081 error message.

SQL> INSERT INTO Example VALUES (10);
INSERT INTO Example VALUES (10);
*
ERROR at line 1:
ORA-12081: update operation not allowed on table "SCOTT"."Example"

SQL> INSERT INTO Example VALUES (10);
INSERT INTO Example VALUES (10);
*
ERROR at line 1:
ORA-12081: update operation not allowed on table "SCOTT"."Example"
DML and DDL operations return to normal once the table is switched back to read-write mode.

SQL> ALTER TABLE Example READ WRITE;
Table altered.

SQL> DELETE FROM Example;
1 row deleted.

SQL> ALTER TABLE Example READ WRITE;
 Table altered.

SQL> DELETE FROM Example;
 1 row deleted.

The read-only status of tables is displayed in the READ_ONLY column of the [DBA|ALL|USER]_TABLES views.

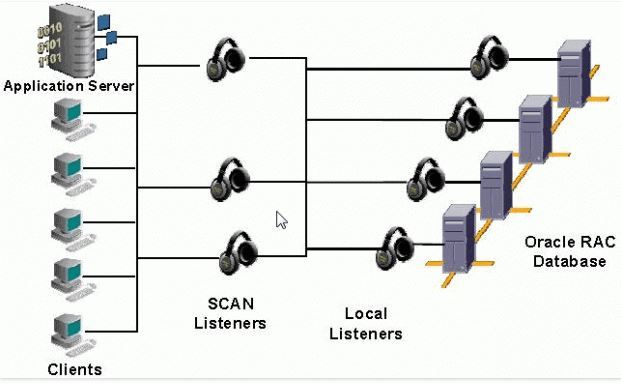
Difference Between Local Listener and Remote Listener

Difference Between Local Listener and Remote Listener


LOCAL_LISTENER is a listener that is running on the same machine as this instance.

REMOTE_LISTENER is a listener that is not running on the same machine as this instance.

Local Listener and Remote Listener concept comes with ORACLE RAC where a single database has multiple instances.

Consider an example of 2 Node RAC Database which is having below components.

TWO Nodes: Node1 and Node2
Two Listeners: listener LSNR1 on Node1 and listener LSNR2 on Node2
Two Instances: instance heart1 on Node1 and instance heart2 on Node2. Database Name is heart.
As per the above information, currently listener LSNR1 is running on Node1 where instance heart1 is present. Then LSNR1 is the Local Listener for heart1 instance as LSNR1 present on the same node where heart1 is running and LSNR2 is the Remote Listener for heart1 instance as LSNR2 is running on different node as the database instance heart1.

Same way, listener LSNR2 is the Local Listener for heart2 instance as LSNR2 present on the same node where heart2 is running and LSNR1 is the Remote Listener for heart2 instance as LSNR1 is running on different node as the database instance heart2.

For Example in RAC, SCAN listeners are remote listeners.

Remote Listener connects to all instances with all listeners so that instances can spread their load balance advisories to all listeners. Listener uses the advisories to decide which instance should service client request. If listener know from advisories that its local instance is least loaded and should service client request then listener passes client request to local instance. If local instance is over loaded then listener can use TNS redirect to redirect client request to a less loaded instance means remote instance. This is called as Server Side Load balancing.

11gR2 Clusterware Startup Sequence

11gR2 Clusterware Startup Sequence


1. When a node of an Oracle Clusterware cluster start/restarts, OHASD is started by platform-specific means. OHASD is the root for bringing up Oracle Clusterware. OHASD has access to the OLR (Oracle Local Registry) stored on the local file system. OLR provides needed data to complete OHASD initialization.
2. OHASD brings up GPNPD and CSSD. CSSD has access to the GPNP Profile stored on the local file system. This profile contains the following vital bootstrap data;

a. ASM Diskgroup Discovery String
b. ASM SPFILE location (Diskgroup name)
c. Name of the ASM Diskgroup containing the Voting Files

3. The Voting Files locations on ASM Disks are accessed by CSSD with well-known pointers in the ASM Disk headers and CSSD is able to complete initialization and start or join an existing cluster.
4. OHASD starts an ASM instance and ASM can now operate with CSSD initialized and operating. The ASM instance uses special code to locate the contents of the ASM SPFILE, assuming it is stored in a Diskgroup.
5. With an ASM instance operating and its Diskgroups mounted, access to Clusterware’s OCR is available to CRSD.
6. OHASD starts CRSD with access to the OCR in an ASM Diskgroup.
7. Clusterware completes initialization and brings up other services under its control.
When Clusterware starts three files are involved.

1. OLR – Is the first file to be read and opened. This file is local and this file contains information regarding where the voting disk is stored
and information to startup the ASM. (e.g ASM DiscoveryString)

2. VOTING DISK – This is the second file to be opened and read, this is dependent on only OLR being accessible.

ASM starts after CSSD or ASM does not start if CSSD is offline (i.e voting file missing)

How are Voting Disks stored in ASM?

Voting disks are placed directly on ASMDISK. Oracle Clusterware will store the votedisk on the disk within a disk group that holds the Voting Files.
Oracle Clusterware does not rely on ASM to access the Voting Files, which means Oracle Clusterware does not need of Diskgroup to read and write on ASMDISK. It is possible to check for existence of voting files on a ASMDISK using the V$ASM_DISK column VOTING_FILE.
So, voting files not depend of Diskgroup to be accessed, does not mean that the diskgroup is not needed, diskgroup and voting file are linked by their settings.

3. OCR – Finally the ASM Instance starts and mount all Diskgroups, then Clusterware Deamon (CRSD) opens and reads the OCR which is stored on Diskgroup.

So, if ASM already started, ASM does not depend on OCR or OLR to be online. ASM depends on CSSD (Votedisk) to be online.

There is a exclusive mode to start ASM without CSSD (but it’s to restore OCR or VOTE purposes)


Level 1: OHASD Spawns:

cssdagent – Agent responsible for spawning CSSD.
orarootagent – Agent responsible for managing all root owned ohasd resources.
oraagent – Agent responsible for managing all oracle owned ohasd resources.
cssdmonitor – Monitors CSSD and node health (along wth the cssdagent).

Level 2.1: OHASD rootagent spawns:

CRSD – Primary daemon responsible for managing cluster resources.
CTSSD – Cluster Time Synchronization Services Daemon
Diskmon
ACFS (ASM Cluster File System) Drivers

Level 2.2: OHASD oraagent spawns:

MDNSD – Used for DNS lookup
GIPCD – Used for inter-process and inter-node communication
GPNPD – Grid Plug & Play Profile Daemon
EVMD – Event Monitor Daemon
ASM – Resource for monitoring ASM instances

Level 3: CRSD spawns:

orarootagent – Agent responsible for managing all root owned crsd resources.
oraagent – Agent responsible for managing all oracle owned crsd resources.

Level 4.1: CRSD rootagent spawns:

Network resource – To monitor the public network
SCAN VIP(s) – Single Client Access Name Virtual IPs
Node VIPs – One per node
ACFS Registery – For mounting ASM Cluster File System
GNS VIP (optional) – VIP for GNS

Level 4.2: CRSD oraagent spawns:

ASM Resouce – ASM Instance(s) resource
Diskgroup – Used for managing/monitoring ASM diskgroups.
DB Resource – Used for monitoring and managing the DB and instances
SCAN Listener – Listener for single client access name, listening on SCAN VIP
Listener – Node listener listening on the Node VIP
Services – Used for monitoring and managing services
ONS – Oracle Notification Service
eONS – Enhanced Oracle Notification Service
GSD – For 9i backward compatibility
GNS (optional) – Grid Naming Service – Performs name resolution

Grid Infrastructure Processes:


Wednesday, July 24, 2019

Patching RAC Database, and Upgradation from 10.2.0.1 to 10.2.0.4.

Patching RAC Database, and Upgradation from 10.2.0.1 to 10.2.0.4.


In Oracle10g RAC upgradation, 1st upgrade clusterware software, 2nd upgrade ASM home and 3rd upgrade Database home.

1.Upgrade Clusterware software (CRS_HOME)
2.Upgrade ASM Home (ASM_HOME)
3.Upgrade Database Home (RDBMS_HOME)
4.Then finally upgrade the RAC Database (Manual or DBCA)

Upgrading Clusterware Software:
Unzip the patch for 10.2.0.4 p6810189_10204_Linux-x86.zip.
$ unzip p6810189_10204_Linux-x86

Manage your data with TimeZone before upgrade
From 9i onwards Oracle has 2 datatypes that may have data stored affected by a update of the RDBMS DST (Daylight Saving Time) definitions, those are TIMESTAMP WITH LOCAL TIME ZONE (TSLTZ) and TIMESTAMP WITH TIME ZONE(TSTZ). If you have TZ data stored in your database you need to go through the following steps to ensure the integrity of your data while the database upgrade.
SQL> select version from v$timezone_file;
If this gives 4 then you may simply proceed with the upgrade.If this gives lower then 4, perform the following steps
Unzip the utlzpv4
SQL> @utltzpv4.sql
After successful execution
SQL> select * from sys_tzuv2_temptab;

Clusterware Patchset Installation:
Rolling Upgrade (No Downtime) for clusterware:
Node 1:
Shut down all processes in the Oracle home on node1 that might be accessing a database.
$ emctl stop dbconsole
Shut down all services
$ srvctl stop service -d orcl
Shut down all Oracle RAC instances on the node1
$ srvctl stop instance -d orcl -i orcl1
If an ASM instance is running, then shut down the ASM instance on the node1
$ srvctl stop asm -n rac1
Stop all node applications on the node1
$ srvctl stop nodeapps -n rac1
If the database is on Instance1,Relocate database to second instance.
#. /crs_relocate ora.orcl.db

Installing Clusterware patchsetup:
Before runInstaller,check whether all the services are down or not on node1.
#crsctl stat res –t
$ Cd Disk1 (p6810189_10204_Linux-x86 patchset directory)
$ . /runInstaller
Oracle universal Installer : Welcome
Next
Oracle universal Installer: Specify Home details
Name: Oracrs10g_home (cluster home)
Path: /u01/crs10g
Oracle universal Installer: Specify Hardware Cluster Installation Mode
Select All node click next
Oracle universal Installer: Install
On node1:
# CRS_home/bin/crsctl stop crs
Run the root102.sh script to automatically start the Oracle Clusterware on the patched node:
# CRS_home/install/root102.sh
On node2:
# CRS_home/bin/crsctl stop crs
Run the root102.sh script to automatically start the Oracle Clusterware on the patched node:
# CRS_home/install/root102.sh
After applying patch on node2, All resources are back now in ONLINE state on both nodes.
#crsctl stat res –t

Oracle RAC Patchset Installation:
Check the version of RAC database:
[oracle@rac1 OPatch]$. /opatch lsinventory
Shut down all processes in the Oracle home on both nodes.
$ emctl stop dbconsole
Shut down all services in the Oracle home on both nodes.
$ srvctl stop service –d orcl –s racdb
Shut down all Oracle RAC instances on the nodes.
$ srvctl stop database –d racdb
If an ASM instance is running, then shut down the ASM instance on the node1
$ srvctl stop asm -n rac1
$ srvctl stop asm -n rac2
Stop the listeners
$ srvctl stop listener –n rac1
$ srvctl stop listener –n rac2

Patchset installation on ASM Home:
$cd patchset_directory/Disk1
$. /runInstaller
Oracle universal Installer : Welcome
Next
Oracle universal Installer: Specify Home details
Name: Oraasm10g_home (ASM home)
Path: /u01/app/oracle/product/10.2.0/asm_1
Oracle universal Installer: Specify Hardware Cluster Installation Mode
Select All node click next
Oracle universal Installer: Install
On node1:
Log in as “root” user
#/oracle/product/10.2.0/asm/root.sh
On node2:
Log in as “root” user
#/oracle/product/10.2.0/asm/root.sh
Now check the patch version:
[oracle@rac1 OPatch]$ ./opatch version

Patchset installation on RDBMS Home:
$cd patchset_directory/Disk1
$. /runInstaller
Oracle universal Installer : Welcome
Next
Oracle universal Installer: Specify Home details
Name: OraDB10g_home (RDBMS home)
Path: /u01/app/oracle/product/10.2.0/db_1
Oracle universal Installer: Specify Hardware Cluster Installation Mode
Select All node click next
Oracle universal Installer: Install
On node1:
Log in as “root” user
#/oracle/product/10.2.0/asm/root.sh
On node2:
Log in as “root” user
#/oracle/product/10.2.0/asm/root.sh

Upgrading a RAC Database(Manually):
Log in as the Oracle user.
$ srvctl start listener -n RAC1
$ srvctl start asm –n RAC1
SQL> STARTUP NOMOUNT
SQL> ALTER SYSTEM SET CLUSTER_DATABASE=FALSE SCOPE=spfile;
SQL> SHUTDOWN
SQL> STARTUP UPGRADE
SQL> SPOOL patch.log
SQL> $ORACLE_HOME/rdbms/admin/catupgrd.sql
SQL> SPOOL OFF
SQL> SHUTDOWN IMMEDIATE
SQL> STARTUP
Run the utlrp.sql script to recompile all invalid PL/SQL packages
SQL> $ORACLE_HOME/rdbms/admin/utlrp.sql
When the 10.2.0.4 patch set is applied to an Oracle Database 10g Standard Edition database, there may be 54 invalid objects after the utlrp.sql script runs. These objects belong to the unsupported components and do not affect the database operation.
Now check the status of all the components after the upgrade.
SQL> select comp_name, version, status from sys.dba_registry;
the status of all the components should be VALID for a successful upgrade.

For RAC database:
SQL> ALTER SYSTEM SET CLUSTER_DATABASE=TRUE SCOPE=spfile;
SQL> SHUTDOWN
SQL> STARTUP

Start any database services
$ srvctl start service -d orcl1 -s serv1

Tuesday, July 23, 2019

What are nodeapps services in Oracle RAC

What are nodeapps services in Oracle RAC


Nodeapps are standard set of oracle application services which are started automatically for RAC.

Node apps Include:

1) VIP.
2) Oracle Net listener.
3) Global Service Daemon.
4) Oracle Notification Service.

Nodeapp Services run on each node of the cluster and will switched over to other nodes through VIP during the failover.


Useful commands to maintain nodeapps services:

To check the status:
srvctl status nodeapps                   

To start the nodeapps services:
srvctl start nodeapps -n NODE1           
srvctl start nodeapps -n NODE2           

To stop nodeapps services:
srvctl stop nodeapps -n NODE1
srvctl stop nodeapps -n NODE2         

Wednesday, April 10, 2019

login process for E-Business Suite (EBS) 12.2.x

login process for E-Business Suite (EBS) 12.2.x 


When a HTTP request is made for EBS, the request is received by the Oracle HTTP Server (OHS).

When the configuration of OHS is for a resource that needs to be processed by Java, such as logging into EBS, the OHS configuration will redirect the request to the Web Logic Server (WLS) Java process (OACore in this case).

WLS determines the J2EE application that should deal with the request, which is called "oacore".

This J2EE application needs to be deployed and available for processing requests in order for the request to succeed.   The J2EE application needs to access a database and does this via a datasource which is configured within WLS.

1.Login HTTP headers
When the EBS login works OK, the browser will be redirected to various different URLs in order for the login page to be displayed.  The page flow below shows the URLs that will be called to display the login page:

/OA_HTML/AppsLogin
EBS Login URL

/OA_HTML/AppsLocalLogin.jsp
Redirects to local login page

/OA_HTML/RF.jsp?function_id=1032925&resp_id=-1&resp_appl_id=-1&security_group_id=0&lang_code=US&oas=3TQG_dtTW1oYy7P5_6r9ag..&params=5LEnOA6Dde-bxji7iwlQUg
Renders the login page

2.The URLs after the user enters username and password, then clicks the "login" button are shown below:

/OA_HTML/OA.jsp?page=/oracle/apps/fnd/sso/login/webui/MainLoginPG&_ri=0&_ti=640290175&language_code=US&requestUrl=&oapc=2&oas=4hoZpUbqVSrv9IE0iJdY1g..

/OA_HTML/OA.jsp?OAFunc=OANEWHOMEPAGE

/OA_HTML/RF.jsp?function_id=MAINMENUREST&security_group_id=0
Renders user home page

3.Once the users home page is displayed, the logout flow also redirects to several different URL before returning to the login page:

/OA_HTML/OALogout.jsp?menu=Y

Logout icon has been clicked

/OA_HTML/AppsLogout

/OA_HTML/AppsLocalLogin.jsp?langCode=US&_logoutRedirect=y
Redirects to the login page

/OA_HTML/RF.jsp?function_id=1032925&resp_id=-1&resp_appl_id=-1&security_group_id=0&lang_code=US&oas=r6JPtR7-a4n5U2H3--ytEg..&params=1JU-PCsoyAO7NMAeJQ.9N6auZoBnO8UYYXjUgSPLHdpzU3015KGHA668whNgEIQ4
Renders login page again